This is for the VanLife bike nuts.
This is how I installed a bicycle work stand in my Sprinter campervan.

Definitely a luxury item for the outdoor crowd. Some people want to watch TV in their Sprinters, I want to adjust my drivetrain. Something for everyone!
I started by ordering a Park Professional wall mount bike stand (Park PRS-4W). It’s expensive but should last a lifetime. I found one for 25% off with free shipping at one of the Labor Day sales. Amazon has a bunch of less expensive wall mounted bike stands as well. The Park stand is shop quality and has an easy to use clamping system.

I chose to use the upper right corner of rear door panel. This way I can open the door fully and work on the slider side of the van. (I’ve seen pics bike stand mounts on the left side).
First I removed the door panel.
The stock, flimsy particle board door panel is probably not adequate for this project. Having a thicker door panel will help to support and distribute the weight of a bicycle.
There is a lot of potential storage space on the back door, so changing out the rear door panel to at least 1/4″ (6mm) plywood should be on your project list.
It is important to stiffen up the corner of the door panel to prevent unwanted flexing and stress on the door sheet metal when a bike is on the stand. I made a steel backing plate to create a “sandwich” and increase the rigidity of the mount. Note- The upper right corner of the door does have extra structural members.
I am using the RB Components rear door storage system. It’s black powder coated aluminum with an expandable storage net. The metal door panel also adds to the stability of the bike stand. A plywood door panel should provide the same stablilty.


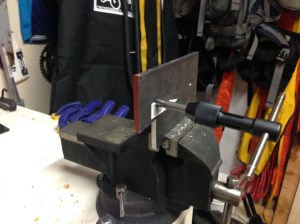
I bought a 4″ x 12″ piece of 1/4″ (6mm) steel from the project metals section of my local hardware store. 1/4″ (6mm) steel plate was more than I needed, but it was all that was in stock. The 1/4″ metal was thick enough to tap in threads.

My final dimension for the backing plate was roughly 6.5″ x 4″ (easy to cut with a reciprocating saw or jigsaw). A 4″ x 6″ plate would have also been adequate if your local hardware store carries that.
I notched approximately 1.5″ out of the corner of the backing plate to clear the stamped indentation and sit flat in the upper corner. Be sure to test fit your backing plate.
Note that the backing plate doesn’t fit straight in. You’ll need to insert it from the bottom and work it into place. Not as difficult as it sounds. Watch for sharp edges.

Then I drilled out my door panel using the stand as a template. I reinstalled the door panel with just a couple screws, transferred the drill marks to the door, and drilled out the door, and applied primer to the bare metal (no bare metal, minimize rust!).
Next to finishing the backing plate. I used stainless steel bolts, so that the threads wouldn’t rust. I used M10 x 35mm if I remember correctly. Those were the only fully threaded bolts my hardware store had in stainless steel. 3/8 works also, as long as they are fully threaded.
Once again I used the workstand base plate to mark the holes on the backing plate. I bought a tap at the hardware store to thread the backing plate (about $20). Check your tapping bit for the right size pilot hole! Cutting threads into this 1/4″ steel was pretty easy with the tap and a couple drops of oil.
Then I threaded my mounting bolts in from the back side (I also used loc-tite to secure the threads so the bolts would never back out), primed the exposed parts of the steel plate, cleaned the front side with alcohol, and applied 3M VHB tape to the front side.
-
- Tapping the threads
-

- Stainless bolts threaded and loc-tited in place
-
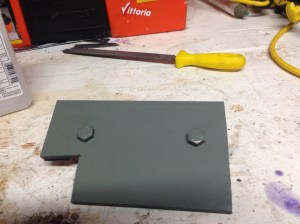
- Primer to protect the steel plate from rust
-
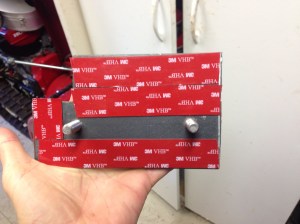
- 3M VHB tape applied to the inside.
Finally, I cleaned the inside of the door panel with a rag and rubbing alcohol. You wouldn’t believe how much gunk collects on the inside surfaces of a van!
-

- Test fitting the mounting base
-
- Ready to install!
-
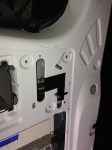
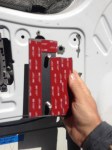
- Backing plate sticking through with a couple pieces of temporary tape to hold it in place
I was now ready to put the whole thing together. I peeled the VHB tape backer, and very carefully worked the whole backing plate inside the door panel without touching anything t0 the tape till it was in the right spot. Then I stuck it firmly to the door, applied a couple pieces of tape to hold it in place (overkill), replaced the door panel, and screwed down the bike stand mounting plate. Because I used loc-tite on the threads of the backing plate,I was able to crank down the backing plate nuts without the bolt spinning.
After the base plate sat overnight to clamp down the VHB tape, I replaced the nuts with wing nuts so that I could remove the base plate entirely in a few seconds if needed. I designed this system so that I could remove the base plate entirely.
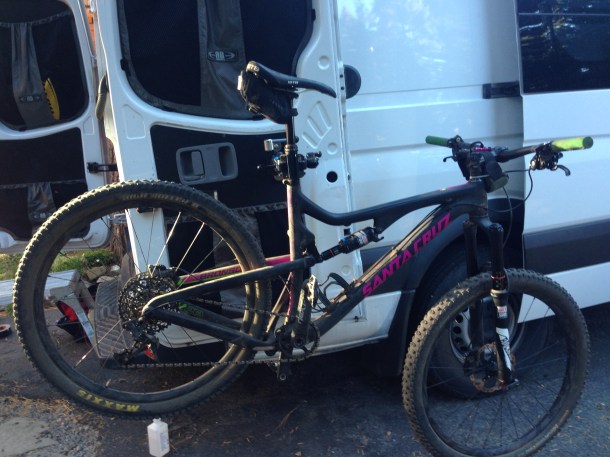
Because the workstand clamp just pulls out from the mountain base, I just store it in my door storage net. The reality is that the bike stand is rarely in use, but great when I need it. When I need to used the bike stand, I slide it in and have a professional work stand in a few seconds. The base plate sticks out about 5″, and hasn’t been in the way yet. I secure the clamp with a cheap elastic strap so that it doesn’t rattle or unscrew when driving.

The base plate. The clamp slides in, or removes in seconds.


Hope that helps. I’d love to hear how your projects went. Leave any comments below. More Sprinter van conversion projects coming. Subscribe to get updated articles and outdoor/mountain life content.
Share this:


I did a similar bike stand install on my TN1 Sprinter – same Park bike stand also on the passenger side door. I chose to put the stand closer to the hinge side of the door to keep the weight closer to the door hinges and to keep the bike further away from the sliding door. Also to keep the stand tucked in closer to the side of the van when the door is closed – and eliminate any conflict with my bikes, that are clamped into the fork mounts and the Handel bars sit very close to the closed door .
LikeLike
Thanks for the feedback. Closer to the hinge side of the door makes sense. Not sure if the T1N Sprinters have a different door handle location. I might have been able to squeeze it in to the left of the door handle on the very inside of the door as well.
Outside Van puts their bike mount in the same location that I did. Good spot for a backing plate.
Cheers!
LikeLike