Disclaimer- I am not a professional. I am a moderately skilled DIYer. Technical wiring diagrams are not my strong suit. My Espar works great. I’m satisfied that it’s a clean, professional installation. My DIY post may contain errors. Use at your own risk. CO (carbon monoxide) leaks can be deadly- especially in small spaces. No cutting corners on your installation!
I recently finished installation of the Espar Airtronic D2 diesel heater. On the list of things that make VanLife and van adventures more awesome, being warm and dry is near the top of the list.
There is a ton of information about the Espar heaters so I won’t

Espar Airtronic D2
duplicate any technical information here. Espar (Eberspacher), is a large company that has been around for decades and has made thousands of these diesel fired heaters for both road and marine use (as well as coolant heaters and other products). Marine diesel heaters of old were smelly and sooty. Modern diesel heaters are cleaner electronically controlled units.
Acknowledgements, Thanks, and Resources
I would not have been able to complete the installation without the immense online knowledge base of those DIYers who came before me. A huge thank you to all those who shared their knowledge and experience. In particular those on the Sprinter Forum, SprinterVanUSA, LeTonkinois Varnish, Traipsing About, and Sprintervandiaries. All great online resources.
Listed below are some of the resources I used for my installation:
(All links open in a new window)
- Sprinter Source– THE Sprinter Forum. THE definitive resource for all Sprinter information. Every topic you can imagine has been covered. Forum is a bit clunky in terms of search, but still a great resource. Play with search terms for best results.
- GeorgeRa build thread– George has an excellent detailed build thread of his 144 DIY Sprinter. He’s shared his knowledge freely and was kind enough to answer a couple of my questions. His template for brackets saved me a ton of time and made for a professional installation.
- GeorgeRa’s Google pics– Excellent photos from GeorgeRas Espar installation with a printable bracket template. Thank you George!
- SprinterVanUSA.com– An excellent DIY build blog. DieselFumes (the author), lists Amazon products for many obscure products. He has written about many technical aspects of DIY sprinters and has a passion for technical details.
- LeTonkinois Varnish– A UK Marine company with excellent resources on the Eberspacher including troubleshooting, and deciphering the controllers and wiring.
- Sprintervandiaries.com– A van build and vanlife travel blog. Great wiring tips for the Easy Start Select. Saved me some frustration.
- Traipsingabout.com– A great blog about van life, their build, and simplifying life to pursue the stuff that matters to you.
- The Espar Underseat Installation build thread– More than you ever wanted to know.
- Wiring Help with Espar– Sprinter Forum Thread. Includes helpful information about the High Altitude Kit.
- Espar of Michigan Tech Manuals
- DiamondSea’s Espar Installation– A different take on installation from the Sprinter Forum.
What size furnace should you get?
The Espar D2 is smaller than a shoebox but cranks out 7,500 BTU at it’s max setting. (For comparison, we have a 40K BTU furnace in our 1,000 square foot home in snow country at 6,300′ elevation).The furnace itself is similar to a modern household furnace. It is a sealed system with both the intake and combustion (exhaust) air outside the van.
Here is a link for household furnace BTU sizing based on climate (sorry US map only). Unless you live in a very cold winter climate or at high altitude, the D2 should be sufficient for most people. Of course a van is a big metal box with lots of conductive heat loss, so insulating your van is a key part of keeping warm (and cool). A 170″ wheelbase Sprinter van is less than 120 square feet.
Putting in a furnace that is too large for your climate may cause unwanted maintenance issues- bigger is not always better. Diesel fired furnaces like the Espar need to run on max regularly to keep from sooting up the combustion chamber. (Diesel is not like propane in this regard). That said, if you are in a brutally cold climate or live year round at high elevation, the D4 may be worth considering.
So How Difficult is it to Install?
The million dollar question! The Espar installation is not very difficult for a moderately skilled DIYer. 95% of the frustration comes from Espar’s technical manuals, and the way they sell their kits. The Airtronics heater install kit comes with a ton of miscellaneous parts to adapt the heater to many different installations. I ended up with a box of unused parts.
The other source of frustration is that the wiring harness supplied by Espar is used for many of their products (and various combinations of their products with a half dozen or so different controllers). There is little clarity in Espar’s instructions for those unfamiliar with reading technical wiring diagrams. You’ll end up with a bunch of unused wires depending on your choice of controller. The whole installation process could be made hours shorter with simplified instructions written for dense people like me.
At the most basic level the Espar installation consists of:
- Mounting the heater to your van (drilling a few holes and bolting it to the floor)
- Running the wiring harness to where your thermostat/controller will be mounted
- Hooking up air intake and exhaust outside van
- Hooking up the hot air duct inside van
- Connecting your fuel line and pump wiring to the diesel tank
- Hooking up your thermostat/controller
- Connecting to power
Espar desperately needs a new technical writer. Even finding technical manuals on their web page is overly complicated.
Mounting the heater
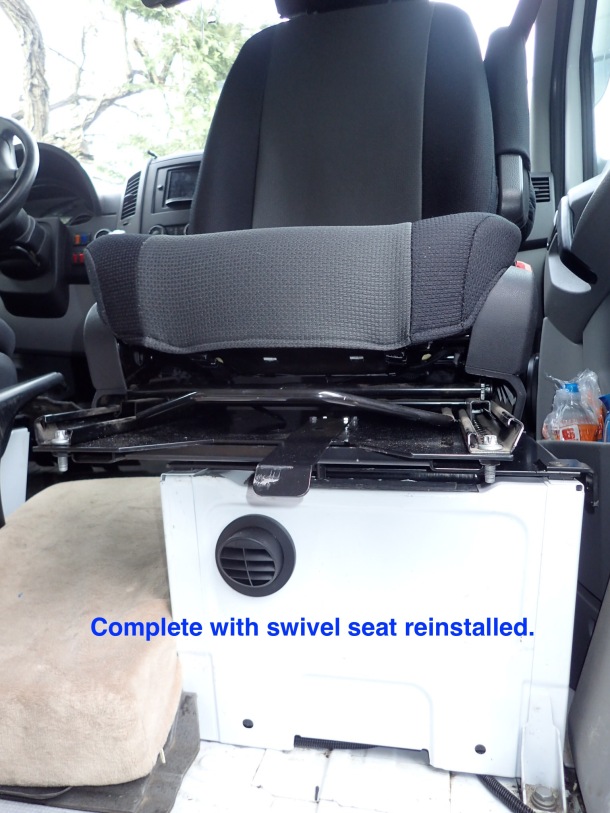
Mounted in the passenger seat base
The passenger seat base is a great place to install the Espar. The passenger seat base is perhaps the most common place to install the Espar heater in a Sprinter van. Many install the Espar near the rear wheel wells as well. The passenger seat base is also commonly used for storage, auxiliary batteries, subwoofers, safes, etc. For those with swivel seat adapters, the passenger seat base becomes mostly inaccessible. My passenger seat base holds a stereo amp as well as the Espar.
The first thing that I did was to run the power and controller wiring through the wiring chase that runs between the front seats (sorry no pics). I used an electrical fishing wire to pull the wires, but a piece of stiff wire poked through would work as well.
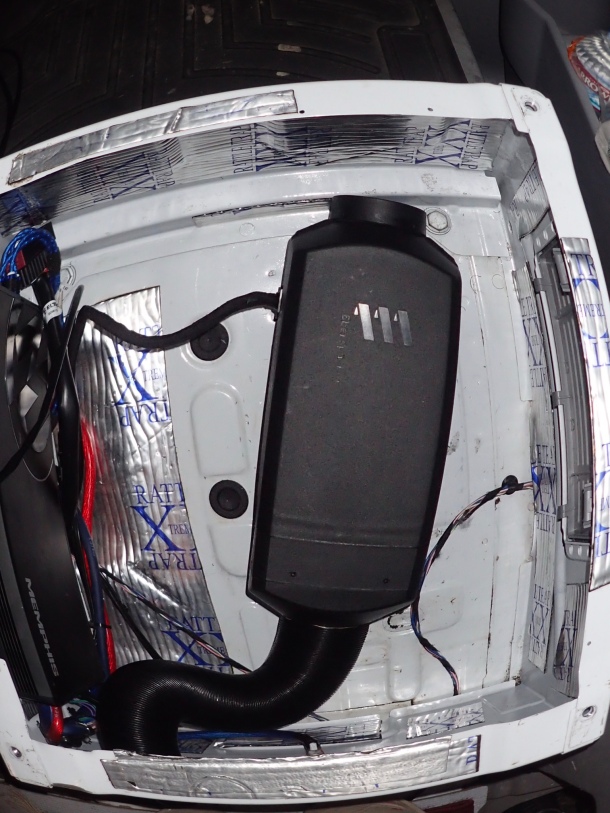
Completed installation. Air duct rotates too!
Some people bring power to the heater from the house battery through the wire chase and install the Espar fuse block in the passenger seat base. Either way works.
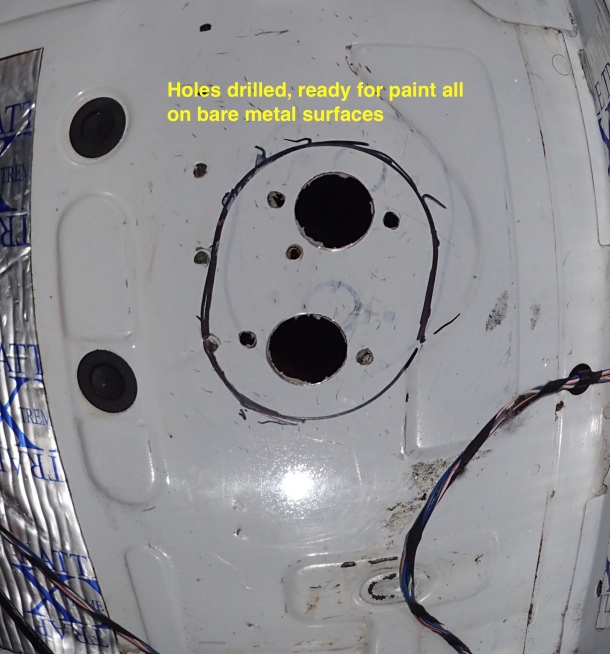
In most of the 2007+ Sprinters, the Espar D2 is an easy mount to the floor of the seat base. On my 2014, there was a perfect spot in the floor. Seat base design has changed slightly from year to year- do a reality check on your floor and seat base.
The gasket on the bottom of the heater makes a great template to trace out your mountain location and hole locations. Espar’s kit includes nuts and lock washers.
(Click for full sized pics)
-

- Drilling template

-

- No turning back now!
-

- Heater, duct, and wiring harness in place
-
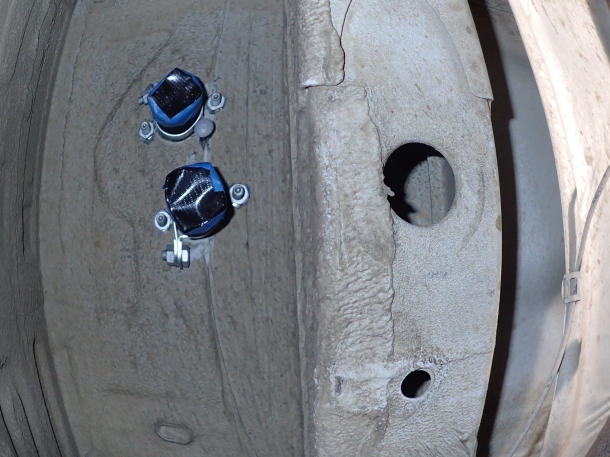
- Underside view (with temporary caps over the intake and exhaust)

Slotted seat access panel
If you are using a swivel seat base, there may not be enough air flow through the seat for the fan. Without enough ventilation through the base, the heater may overheat and shut down. Hein (from the Sprinter forum), has an Ebay store (impactproducts) with a variety of well designed Sprinter products. I am using his slotted side access panel to ensure adequate air flow through the seat base.
Power Supply
The power supply for the D2 requires a 5 amp and 20 amp fuse (5 amp for the controller and 20 amp for the heater). My power harness had 4 wires of which the D2 uses two.
Espar includes a fuse block with their kit. The Espar power wire is also quite long. I was able to run the Espar power wires directly to my house battery fuse block (Blue Sea Systems 12 position fuse holder) and use my own fuse block.
-

- Blue sea fuse block
-

- Espar Fuse block
-
- Espar Fuse block
-
- Blue sea fuse block
Again, either way works. It was easier and cleaner in my installation to keep all the van fuses in a single location, and cut a few steps from the install.
Fuel Supply
The fuel supply, fuel pump, and fuel pump power supply may be the most complicated aspect of the passenger seat installation. For 2007+ Sprinters, accessing the auxiliary fuel tap is easy.
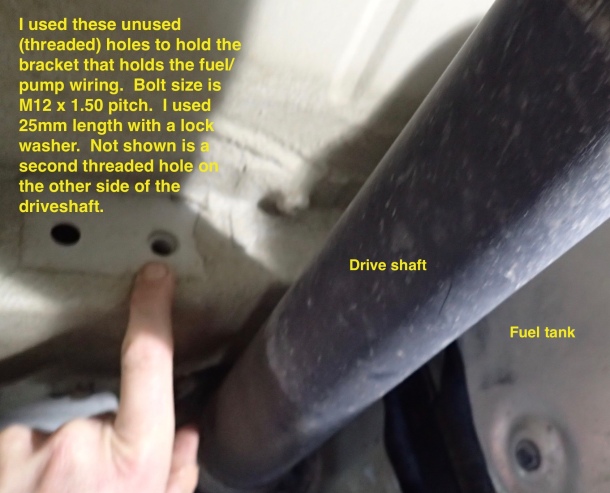
The challenge is passing the fuel line and fuel pump power over the exhaust and drive shaft to the fuel tank. I followed GeorgeRas excellent example and bracket system.
I’m a visual learner. Below are 40+ pics detailing how I made the brackets and routed the fuel pump and fuel line over the heat shield and drive shaft.
(Click pics for full size images- many have markup notes).
-

- Brackets to pass fuel supply over the exhaust and driveshaft
-

- GeorgeRas excellent bracket
-

- Brackets with zip ties

-

- Setting the fuel pump angle
-

- Mounting the fuel pump
-

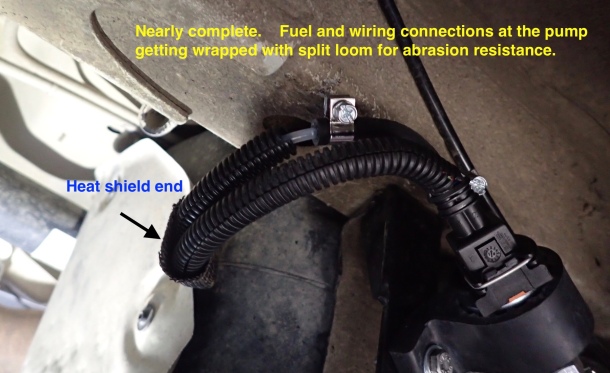
- Ready for connection

-

- Fuel pump connection to Aux fuel tap
-

- Test assembling the fuel system in a clean work area
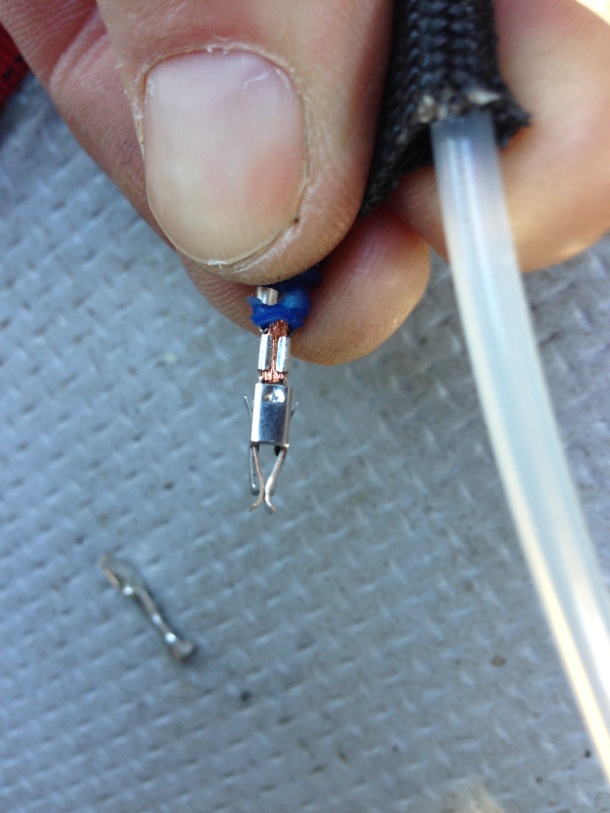
-
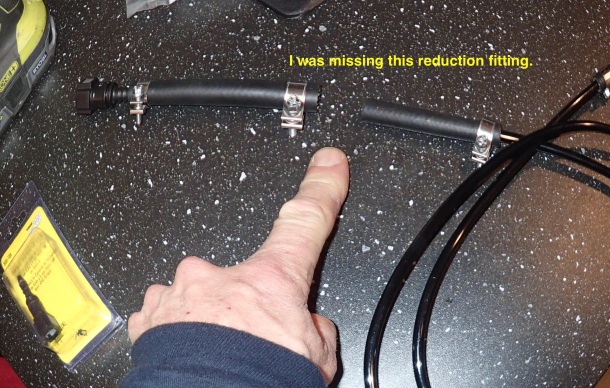
- Missing barb


-

- Dorman fuel tap and fuel hose.
-

- Fuel tap in front left corner of fuel tank
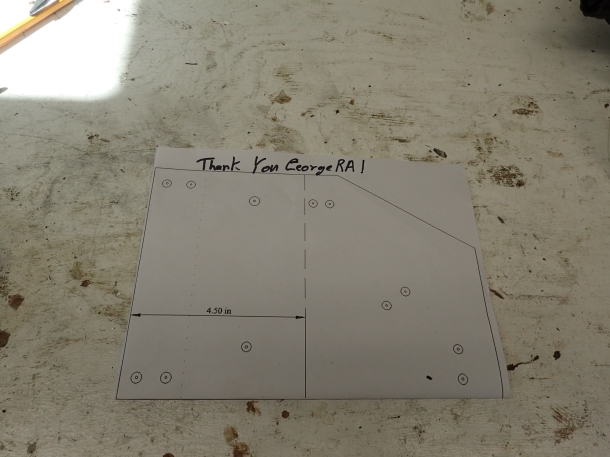
-

- GeorgeRas bracket template

-

- Bending the aluminum plate


-
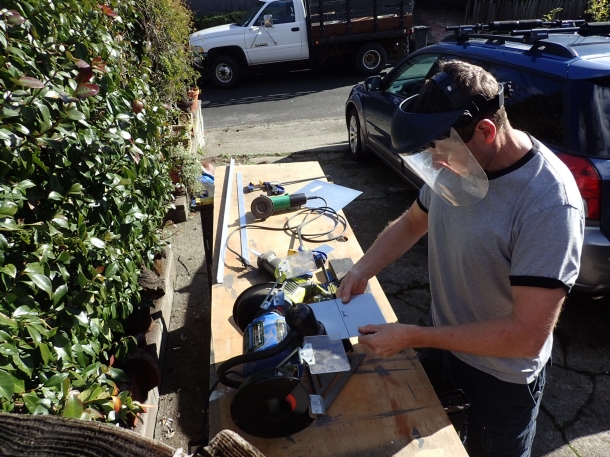
- Cleaning up the edges
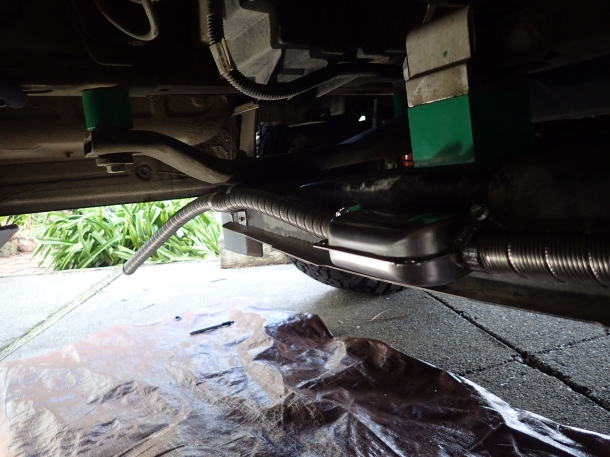
-

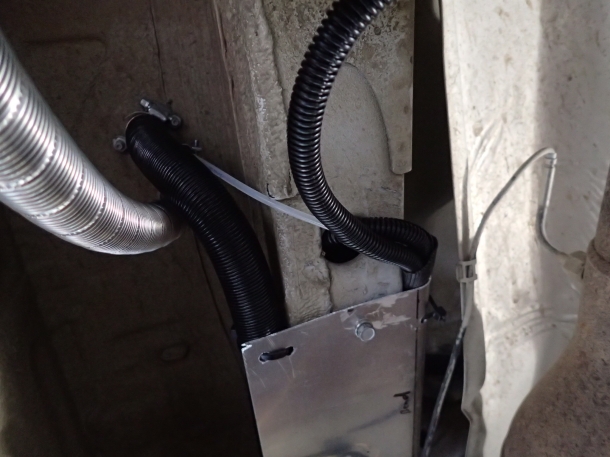
- Heat shield

-
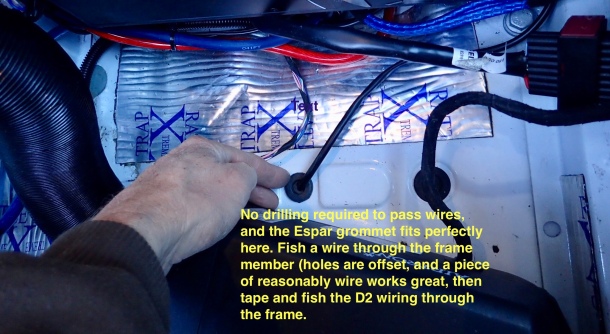
- Passing the fuel pump power through the floor
-

- Air intake
-

- Air intake


-

- Cutting the exhaust tubing

-
- Heater fuel pump wiring


-

- Using a nail to mark drilling holes for zip ties

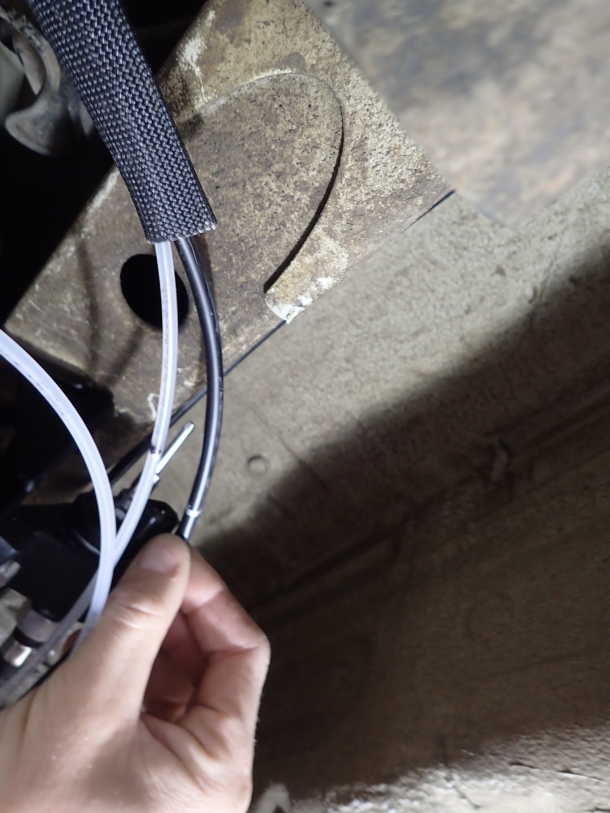
With the passenger seat base installation you’ll need to pass the fuel line and fuel pump power line over the exhaust heat shield and drive shaft. Luckily there is a pretty clear path with some attachment points.
You’ll find additional pics and a printable version of GeorgeRas bracket template on his Google album.
Exhaust and intake
The air intake sits nicely on GeorgeRa’s bracket detailed above.
I made an early decision to route the exhaust away from the sliding door. When we are parked, our primary access is through the slider. I did not want to have diesel smell or exhaust near my primary access door. Many people run the exhaust backward to the passenger side wheel well, or just route it to the outside near the passenger front door. All are decent options, but I’m happy with my decision to route the exhaust to the opposite side of the van. Standing near the exhaust, you can smell a bit of diesel exhaust (which confirmed my decision to do a more complicated exhaust path).
The maximum length of the (24mm) exhaust is 2 meters (6’6″). I was able to run the exhaust to the drivers side (under the drivers door) with approximately 5’8″ of exhaust tubing.
From everything I’ve read, installing the muffler immediately is the right way to do this installation. Apparently the heater sounds like a small jet engine without the muffler. The noise of the heater outside the van is a low whoosh with the muffler.
-

- Routing exhaust away from sliding door
-

- Flex bracket
-

- Exhaust under the driver’s door
-

- Three attempts at making exhaust brackets
-
- Muffler mounted mid-point
-
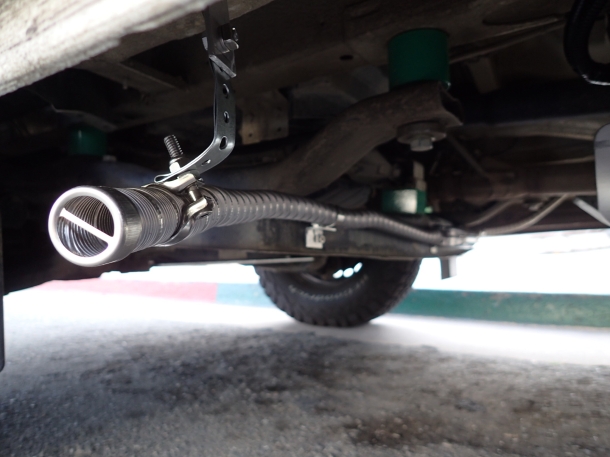
- Completed exhaust
-

- Flex bracket

-
- Air intake
-
- Air intake
Wiring the controller
Wiring the controller is one of the sources of frustration with installing the heater. Espar’s documentation is…lacking. Those used to reading technical wiring diagrams have an easier time with the thermostat installation.
I accidentally ordered the Easy Start Select controller with my kit from Heatso.com. I installed the Easy Start Select and quickly realized that I wanted the diagnostic functions of the 801 controller. I hooked up the Easy Start for a few days, then swapped to the 801.
There are at least six different Espar controllers with slightly different wiring (part of the frustration since there isn’t one straightforward answer to hooking up your controller). The other frustration is that my Espar wiring harness contained ten wires, of which you’ll need three for the Easy Start Select, and six for the 801 controller.
The 801 controller has the ability to show fault codes and make it possible for a field repair of the heater. The 801 controller also has a temp sensor on the controller.
Easy Start Select
The Easy Start Select is nearly plug and play into the High Altitude Kit for running the heater above 4,600′ (1400 meters)- with a catch . It also only requires three wires for installation. It works fine, but doesn’t include diagnostic functions. The harness for the Easy Start plugs right into the High Altitude controller harness- but you’d have to locate the altitude sensor within about 18″ of the Easy Start, so it’s plug and play function may not work if you need to put your altitude sensor elsewhere.
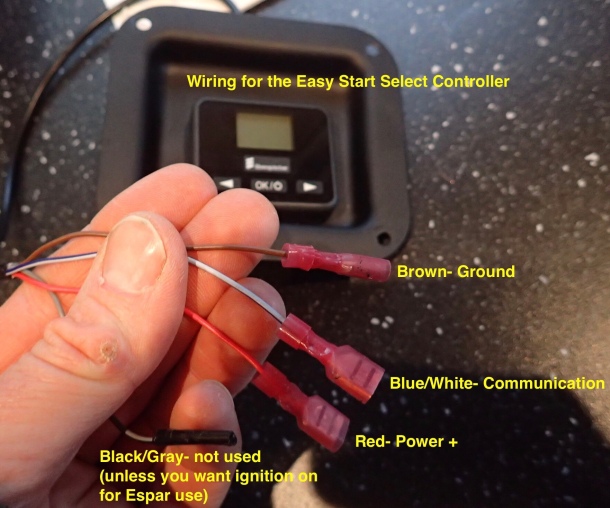
Easy Start Select
In addition to the three wires above, the Easy Start also requires Brown/White and Grey/Red wires to be connected. I missed this on the first attempt and got an error message of — (three dashes) on the controller.
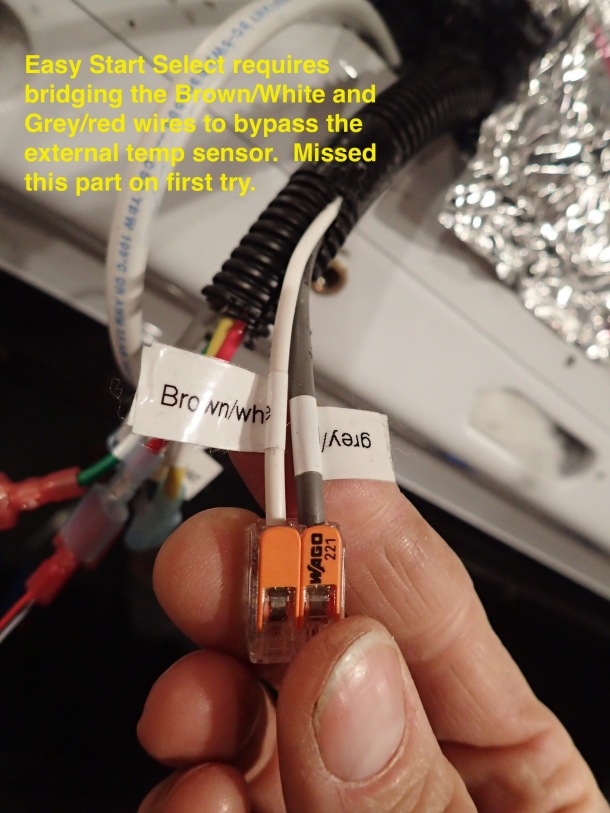
Espar Wiring Harnesses
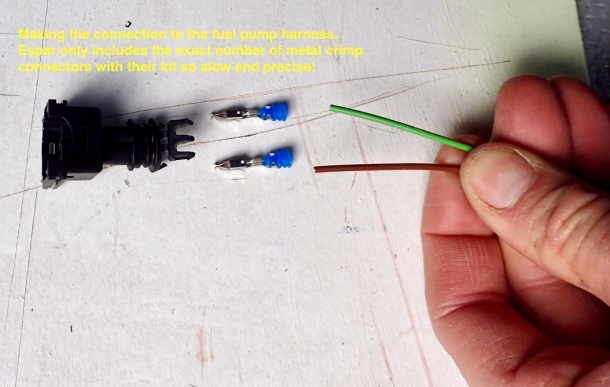
You’ll notice in the above pic that I used my own wire connectors instead of the Espar Harness. The supplied Espar wire harnesses are fine. They also only include the exact number of terminals needed! Mess up a crimp and your installation comes to a halt. Definitely one of the frustrations with the Espar kit. Everyone botches a crimp occasionally. It’s a cheap part to supply a few extra.
After struggling with the Espar terminals (I crushed a terminal, then dropped one into a crack in five minutes), I scrapped them and used my own connectors. I buy them by the 100-pack on Amazon. Mess up a crimp, cut it off and go again. Lose 10 seconds of your time. Mess up an Espar terminal, and it’s a trip to the electronics supply store. The Espar harnesses are nice and compact. Easy to get the crimps right working at a well lit workbench. Harder in the real world of working in a van.
I invested in a nice Ancor insulated wire crimper– about $60 on Amazon. Makes perfect crimps 98% of the time. (For comparison, I own three other crimpers, and the Ancor makes the most consistently strong crimps on insulated connectors. I always give them a firm yank to test).
Electricity doesn’t care what connector you use as long as the connection is solid and properly sized. All my connections were hidden behind walls. Not pretty, but they all work and install quickly (and disconnect easily). That said, if you are a whiz with crimping and detail work, use the Espar harnesses.
801 Controller
The 801 Controller provides the same basic function as the Easy Start, but includes the ability to read fault codes from the Espar heater. This is a key function, and may allow you to diagnose and repair the heater on the road.
On a side note- I checked the fault codes on my 801 out of curiosity. The heater was working fine, but displayed two fault codes stored in memory. They were both correct. The first one was Code 48- Fuel pump open circuit, and the second one was Code 62 open diagnostic circuit. During installation I plugged in the heater without the fuel pump hooked up (to check my thermostat wiring). Later I had the blue/white wire disconnected while wiring in the High Altitude Kit. The heater detected both faults, and would have lead to an easy fix.
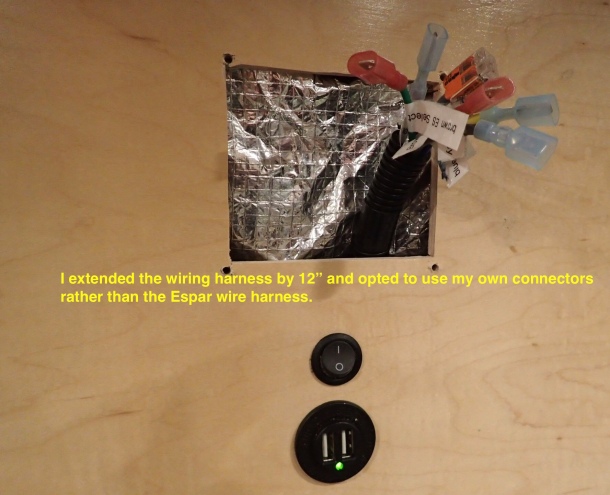
The 801 controller uses six wires, but the wiring has seven wires. The brown wire coming from the wiring harness is not used for the 801 controller (but is with the Easy Start, go figure). As with the Easy Start, I scrapped the Espar harness, cut their terminals off, and installed my own.
I also needed to extend the Espar wiring harness by about 12″ to get to my desired wall location. I made my own ugly but functional bundle and crimped my own connectors.
-

- Extension bundle, labeled on both ends
-
- Scrapped the Espar harness and made my own bundle.
Changing from Celsius to Fahrenheit (or vice versa)
I bought my Espar D2 kit from Heatso.com in London (with two day shipping to California). The Heatso D2 kit was about $850 with muffler, and everything you need for a basic installation. The only wrinkle was that the 801 controller came preset for Celsius.
To change from Celsius to Fahrenheit (or vice versa)-
1- Disconnect the power from the 801 controller
2- Hold down the up and down buttons
3- Reconnect power to the controller
4- On the display you will see n + a number from 0-7 (mine was n0)
5- Use the up arrow to dial the number up to one of the Fahrenheit settings (see below)
6- Press the Heat button to save the setting
7- Voila!
-
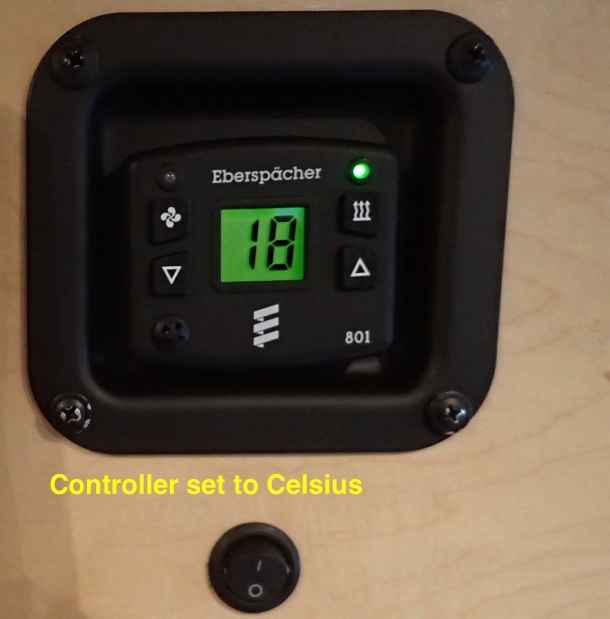
- Celsius
-

- Setting to Fahrenheit
-

- Fahrenheit
Use the above instructions to change from Fahrenheit to Celsius as well.
Note- The process above also changes the heater max run time. You can set it for continuous, 1-hour, or 10-hour. Newer controllers also have a 4-hour setting. The continuous run setting has the potential to burn a lot of fuel if you forget it on. I chose the 10-hour setting in case I forgot it on and parked the van for a week.
The information below was copied from the LeTonkinois Varnish website. There are a number of max time settings.
To change the duration setting
Disconnect the Digi-controller from power. Press and hold down the “UP” and “DOWN” keys. Re-apply power to the unit.
The display will read n0, n1, n2, n3, n4 or n5, release both keys.
Repeatedly press the “UP” or “DOWN” button until the display reads the required setting as follows:
Modes for controller with 6 presets:
n0 deg C, continuous run, n1 deg F, continuous run
n2 deg C, 1 hour duration, n3 deg F, 1 hour duration
n4 deg C, 10 hour duration, n5 deg F, 10 hour duration (Factory preset)
Modes for controller with 8 presets:
n0 degC, continuous run time, n4 degF, continuous run time
n1 degC, 1 hour run time, n5 degF, 1 hour run time
n2 degC, 4 hour run time, n6 degF, 4 hour run time
n3 degC, 10 hour run time, n7 degF, 10 hour run time (Factory preset)
To store the new setting press the “Heat” key and the display will return to ambient temperature.
High Altitude Sensor
Newer Espar heaters have a high altitude accessory. The High Altitude Kit (HAK) is basically a barometric pressure sensor that leans out delivery of the fuel at altitudes above 1400 meters (4,600′). The HAK may not be necessary for you if you are only driving through the mountains. However, the heater combustion chamber may soot up and stop working for prolonged use at altitude. If you are delivering the same amount of fuel with reduced oxygen, you’ll get incomplete combustion (and foul up your heater innards).
If you live at altitude, or plan on long road trips in the mountains, the HAK is a good idea. I don’t have enough experience with the HAK in use to be an expert. I read a report from someone in Breckenridge, Colorado (8,900′ elevation), that his brand new D2 stopped working within two weeks without the HAK (due to soot buildup).
The altitude sensor needs to be installed in an open location where it can sense changes in barometric pressure and change fuel delivery to compensate for reduced oxygen. Don’t bury it inside a wall or cabinet.
The HAK is very easy to install with the Easy Start Select controller, but more complex with the 801 controller.
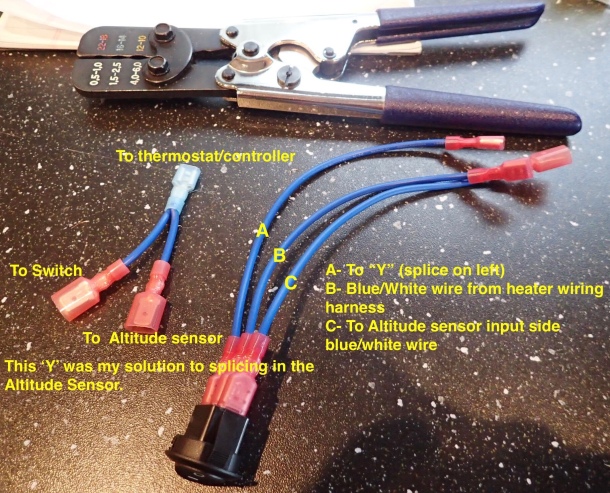
In order to make the HAK work with the 801 controller, you need to wire in a toggle switch. The altitude sensor AND the fault code reader both use the blue/white diagnostic wire. They can not both be operational at the same time. In other words, you can have the altitude sensor functioning, OR be able to read the fault codes in the event of a heater failure. I plan to leave the switch in the altitude setting unless I have heater issues.
To make the 801 Controller compatible with the altitude kit, you’ll need to wire in a switch that goes Either through the HAK, or bypasses the HAK and goes straight to the 801 controller. You’ll need to use an SPDT (single pole double throw switch). Sounds complicated, but is pretty straightforward once you stare at the wires for a couple hours and swear a few times. There are a number of inexpensive switch options available, but the right search term is “SPDT on on switch”
Below are some pics of how I approached the wiring. You can read more about the HAK installation in this thread from the Sprinter Forum.
-
- Prepping the switch
-
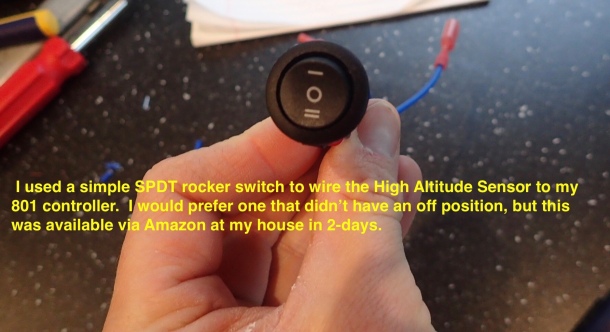
- SPDT rocker switch
-

- Mountain the HA sensor
-
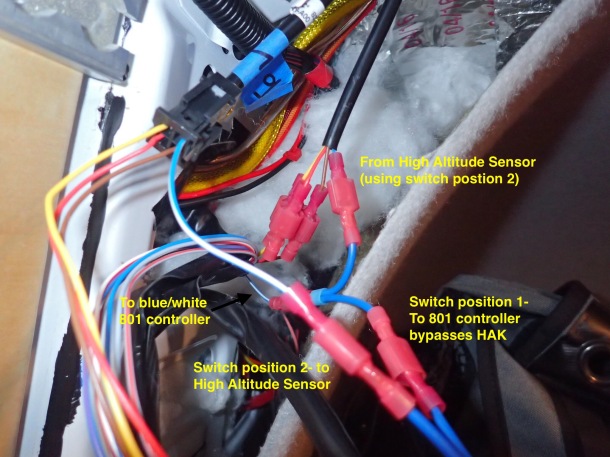
- Notes on wiring
-

- Switch functions
-

- HA sensor and switch tucked out of the way
-

- OLYMPUS DIGITAL CAMERA
-
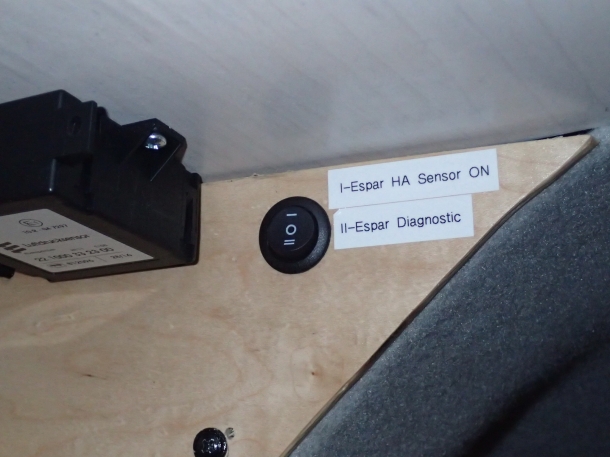
- Labeling for clarity
-

- Heater data function
-
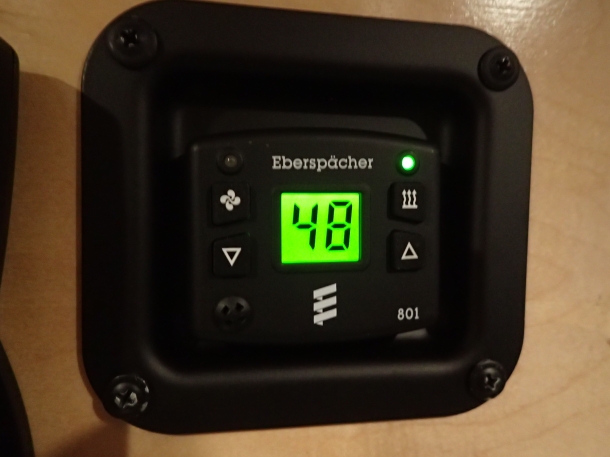
- Fault code 48- triggered when I plugged in power without the fuel pump connected.
Starting the heater for the first time
The last part of the installation is to insert the fuses and power up the heater. You may need to run a few cycles with the heater for it to pump diesel fuel from the tank all the way to the heater.
During my initial startup, I turned the heater on, then slid under the van to watch the fuel line. Click, click, click, click goes the fuel pump. Within a few seconds I began to see a mix of diesel and air bubbles moving through the fuel line! The pump will run for a while until the heater shuts down for lack of fuel. I’ve read that 2-3 shutdown cycles are normal during the initial run. The fuel pump needs to purge all the air from the fuel line.
When my heater shut down after the first attempt, I pulled the fuses, waited a few seconds, reinserted the fuses, and fired up the heater again. Click, click, click… I watched the fuel line near where it entered the heater and then went up top. The fan was moving slowly blowing cold air. Then the air began to warm up and the fan speed ramped up till it as so hot that I couldn’t hold my hands in front of the vent! Success!
During the initial startup, I had a bit of smoke and burning smell coming out of the heater and exhaust as the heater burned off manufacturing oils. Within 5 minutes the wispy smoke was gone. Within 20 minutes the burning smell was gone.
Final notes
The heater has been in for a few weeks now, and I still smile every time I turn it on. Really looking forward to expanding our range of trips. The vent is so hot on it’s max setting that my lovely girlfriend can use it to dry her hair!
I’ve read the the auxiliary fuel tap on the 2007+ Sprinters will only pump to about 1/4 tank. I’ve also read that if you are below 1/2 tank, and parked on a hill, the auxiliary fuel tap may not work and the heater will shut down (or not start). Keep those tidbits in mind if camping in cold weather.
Lastly, the heater uses the most power during initial startup when the glow plug is heating. After the glow plug does its thing, the power consumption quickly levels off.
I’m no expert on diesel heaters. I only know what I researched for my installation and my own experience of installation. My goal with this nearly 4000 word post (and well over 100 pics) is to help others with their own installations and answer some of the questions that I spent hours researching. Hopefully it helps.
I’m a visual learner. If I can see it, I can (probably) do it. Photos and tidbits are immensely helpful for me, even if I take a slightly different path on installation.
Comments and Feedback are welcome. I may not be able to answer technical questions though.
Share this:


Nice write up. I want to find out the inside diameter of the black hard plastic hose because I have a bunch of metric fuel line parts that might be useful to guys like yourself. If you have a piece of it left over I’d love to get a measurement (number drill size of the inside) I most assuredly have the adapter you had to put together with the union and barbs.
Ps not to be too picky but the crimp on the pump terminals is not correct. I have reels of those terminals and the proper crimper to do it (we do race car harnesses) If you are ever in Huntington beach I will recrimp them for you with new terminals gratis.
cheers
Jim
LikeLike
Hey Jim- Thanks for the kind words. I might have tossed my excess hose, but I will take a look in the garage. The Espar install kit was pretty complete and included dozens of small parts I didn’t need. The down side of it is that Espar only includes the exact number of crimps.
I wasn’t happy with one of the crimps as you keenly noticed. I was kind of stuck since it was specific to that fuel pump harness. Will redo it sometime soon. I’m moving on to a diesel fired hot water system- an Espar D5 mounted under the chassis plumbed to an Isotemp Slim marine hot water heater. Will make sure to order extra crimps.
LikeLike
email me if you have trouble getting more terminals. one thing you could do as a stopgap since you are redoing your system is simply extract the terminals and put a small amount of solder at the wire/terminal joint. not enough that the solder wicks up the wire but enough to function as a fail safe until you can start with a fresh terminal and proper open barrel crimpers.
LikeLike
What is the proper crimper and terminals? Could you post some pictures or a link to where to buy them?? Thanks.
LikeLike
Hi Amy-
Sorry for the late reply. I actually ended up cutting off and scrapping many of the factory terminals. Only the exact number necessary are supplied with the kit. My favorite crimper is the ANCOR crimper available from Amazon. About $70 I think. I’ve had a bunch of the ones in the $10-30 range and they don’t make consistently strong crimps. I believe it’s the ANCOR 702010 crimper. For terminals I used either ANCOR or Blue Sea (same company- not cheap, but high quality).
LikeLike
HI. You know I also spent hours researching the setting up as the manuals did not answer all my questions and they left me helpless on some issues. It has taken me approx 15 hours to install my D2 in our VW crafter camper and I also brought my heater from the same place as you. Thought it strange that I could not see an temp sensor on the easy start controller and wondered how this was going to work with mine as I am taking fresh air in from outside and not ducted from the cabon so it always will run at full speed as reading that the sensor is on the intake side in the D2. So I now have ordered an additional temp sensor but reading your post, I should have got a 801 controller. Also I could not get the so called cabin temp to show and was not unitl i read your post on joining the Br/Wh and Gr/Wh together that i got it going. No where it tells me that in the manuals!! Great work. thanks.
LikeLike
FWIW, the Easystart controllers DO show fault codes. You need to get into the Workshop menu to view the fault codes. You also don’t need to wire in a switch to read the fault codes when using the high altitude kit. The blue/white wire is passed through to the Easystart controller.
LikeLike
Fantastic write up! I’m so glad there are kind people in the world that think of us ham fisted DIY’ers!
Without this page as a reference, I’d still be under my van now, and it’s pitch black and 10.30pm
so thanks a million : )
LikeLike
Just installed HAK with my 801 controller. Have you been able to tell if your HAK is actually working with a message in diagnostic mode ? Thanks for write up, sending some beer your way.
LikeLike
Thanks for the support!
No, I haven’t been able to tell anything to see if the HAK is working. One of those goofy frustrating Eberspacher things. My only experimenting with it yielded diagnostic codes in one setting on my switch, and no diagnostic codes when set to the HAK. With any luck, you’ll be able to leave it in the HAK setting and never have to pull diagnostic codes. Ours has been in for a year now with no issues. It’s rarely used during the summer, but it was great a couple weeks ago when we had a frosty 30 degree morning.
LikeLike
Hey man thanks a ton for your post! I used it to help get some of the wiring correct to the select. I’ve used it now in 9 degree weather but it only heated up the interior to about 50 degrees.:-(I’m wondering if it’s because the van is not fully insulated yet. All the big areas have full insulation. Made me a little sad that I couldn’t get it up to 70 degrees. Have you experienced anything similar?
LikeLike
We’ve only used it down into the 20s so far. But insulation and wall panels were installed long before the Espar. Hopefully your build now includes robust insulation.
LikeLike
thanks for the write up. I bought a D4 for one of my equipment trailers here in Alaska so we can keep our chemicals warm while away on jobs. It came with no wiring info . No install info either. Your write up will get me started if not completed.
LikeLike
I know this is old, but what happened when you didn’t short the outside temperature wires? My fan will turn on but the burner won’t. Could be fuel but also wondering about this…I didn’t see anything about it.
LikeLike
It was just never an issue. The outside temp wires aren’t required. I’d check the fuel delivery first. May take 2-3 cycles to get fuel to the heater. The little diesel pump is quite slow. I crawled underneath and watched it slowly push air bubbles out. Also doesn’t work with factory aux fuel tap if you have below 1/4 tank of fuel. Hope that helps.
LikeLike
Hi, looking for info on installing coolant heater, more specifically a coolant flow diagram on newer ones (2014 3 L) and best place in order to flow through engine and heat exchanger. They come with factory optional ones but not sure how they are plumbed.
LikeLike
I made an off grid hot water system with an Espar D5 coolant heater/Isotemp Marine hot water heater, but haven’t yet plumbed it into the engine as an engine pre-heater. If I plan any serious winter travel I might. I think I can get it done with two three way valves and have both engine pre-heater or hot water. Tying the coolant heater in is a job I’d have my local independent shop do, just for peace of mind- but many DIYers do it themselves. The Espar D5 installation is just like the Airtronic (one heats fluid, one heats air).
I’d recommend the sprinter forum. Hein and a few others tied into the coolant system for their hot water heaters. It’s a clunky forum, but spend a few hours reading and you’ll find a tone of useful info and pics. I remember seeing some detail pics of the spot the Espar tied into.
My understanding is also that the factory pre-heater (basically an Eberspacher/Espar D5) is of limited use for conversions (and dual use like radiant heating or hot water). It is integrated into the Mercedes electronics pretty heavily. Doesn’t turn on if temp is above 38F or so. I don’t know of anyone who didn’t have issues making it work dual purpose. Probably better to just install a coolant heater from scratch and tie in.
Hope that helps.
LikeLike