Many of my blog posts about building out RadVan as our DIY Adventure Mobile could easily be retitled- “Stuff I had to figure out on my own that I wish someone had written about and saved me hours of research, experimenting, and frustration.” This post is along the same lines. Hope it helps.
L-Track is amazing stuff. Lots has been written about the use of L-Track in campervan conversions to maximize function and storage in vans. I ended up using a ton of L-Track in RadVan to maximize gear attachment points and conceal wall and ceiling joints.
L-Track for those who are not familiar with it is a standardized modular cargo track system used in trucks, wheelchair vans, etc.
Once your L-track is installed, there are a variety of rings, hooks and attachment points available. All the L-Track accessories can typically be moved in 1-inch increments and removed in seconds.
One of the things about DIY campervans is that we all “learn as we go along.” I learned about L-Track by seeing it in some boutique custom vans and was immediately struck by how functional it is.
Uses for L-Track
- Hanging soft storage
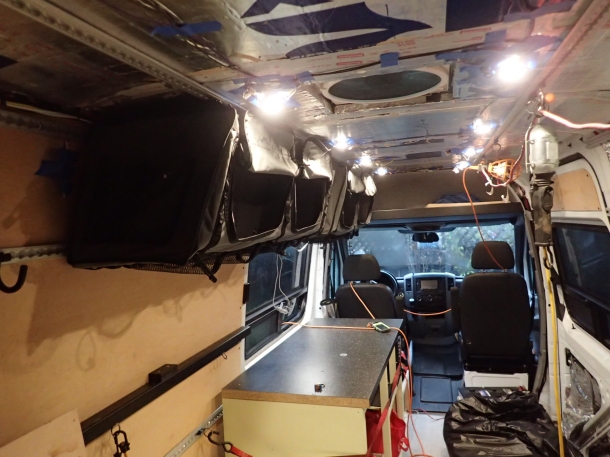
The L-Track is used to hang modular storage cabinets from Adventure Wagon.
- Securing bikes

I used a strip of recessed L-track to make easily adjustable fork mounts for our bikes. We can easily hold four bikes underneath the platform bed.
- Securing loads
Safely securing loads is the most important use of L-Track. In the event of collision, you don’t want anything flying around the cabin. Use L-Track to secure loose items not only to control clutter, but to keep anything from accelerating toward your head in the event of a crash or emergency stop.
Different types of L-Track
Over the course of building my van I ended up ordering several different styles of L-Track.
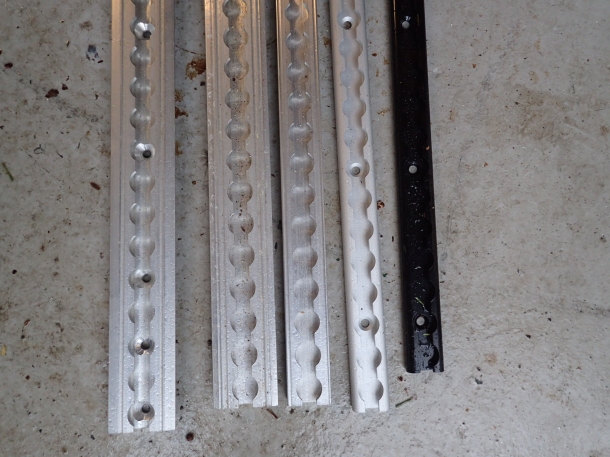
Left to right: Pre-drilled recessed (flanged), undrilled recessed, surface mount (undrilled), surface mount low profile, powder coated surface mount.
I ended up using the recessed style L-track on the lower walls and ceiling as a method of helping to hang the walls and to conceal the plywood joint. For the upper walls, bed rails, and door, I used surface mount L-track.

Side view of the some of the different profiles. (The camera distorted the end pieces to look narrower).
Drilled vs undrilled L-Track
L-Track is available in both pre-drilled and blank styles. Pre-drilled L-Track is typically drilled at 4-inch or 5-inch intervals. I ended up using both styles in different parts of the van.
Pre-drilled L-Track is great for flat surfaces with a continuous mounting surface. L-Track is mostly commonly available with holes drilled at 4 or 5-inches. L-Track drilled at 4″ intervals is likely overkill for a campervan in most cases. (In a commercial truck hauling heavy loads, 4″ attachment points are great).
I found that undrilled L-track is the most flexible for use in a campervan conversion, but adds extra steps in mounting. Cargo Equipment Corp is the only supplier that I found that has undrilled L-track available in 100″ lengths without a special order. If I had to build another van I would have special ordered undrilled low profile L-Track well in advance of my build (lighter with more rounded corners).
I ended up using pre-drilled L-Track in the lower walls and rear doors, and undrilled L-Track in the ceiling and upper walls. The structural beams that run across the ceiling and upper walls don’t correspond to regular holes.
Mounting L-Track
There are two primary ways to mount L-Track into a van- Rivnuts (aka Rivet Nuts, blind insert nuts, or nutserts), and pop-rivets.
Use a drill bit stop!- Absolutely positively do not drill into your van without a drill stop.
The sheet metal siding in vehicles will easily dimple or chip the exterior paint if you drill too far. Trust me on this. I know from experience- when my DIY bit stop slipped. Even with a steady hand I’ve found that the last bit of metal lets go quickly and you’ll end punching all then way to the drill chuck without a good collar.
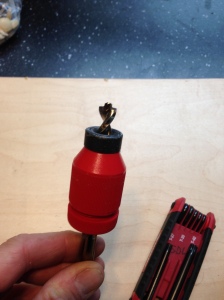
Double drill stop! Not optional when drilling your van!
There are different inexpensive drill bit stops available on Amazon or at your local hardware store. I doubled up on bit stops for extra safety as shown in the pic on the right. I found that the simple metal collar type can slip. My bit stop setup is as follows- Century Drill and Tool Adjustable Drill Stop on the bottom and a simple collar type on the top.
There are a ton of inexpensive drill stops available. Cheap insurance against damage to your van!
I used Rivnuts for installing my L-Track in most locations. I bought an Astro 1442 Riveter Kit from Amazon. Definitely worth the money if you plan on installing a bunch of L-track in your van. There are a number of online videos on how to install Rivnuts without a tool as well. The ease of installing the Rivnut with a dedicated tool is worth the time you’ll save.
The Astro 1442 in use
The Astro 1442 is a good tool that takes a few practice pieces to get the hang of. I’ve found that the Astro 1442 can easily tear the threads out of 10-24 and M4 Rivnuts. It can also destroy the threads of 1/4-20 and M5 Rivnuts as well. Do a few practice pieces to get the hang of it. Too much torque and you’ll damage the threads- Too little torque and your Rivnut will spin.
I have a love/hate relationship with Rivnuts. On the “love side” you can easily install threads on any sheet metal surface. On the “hate side”, the soft metal that allows the Rivnut to flare easily into sheet metal also makes for soft threads. I’ve had about a 10-20% failure rate on my Rivnuts, and have had to drill out and replace some of them. In general, the larger the Rivnut, the stronger the threads will be. Go bigger where it makes sense.
I’ve ended up using 10-24, 1/4-20, 5/16-18, and M8 Rivnuts in various places in the van. I originally started with the idea of keeping everything metric in the van, but found that some SAE sizes fit more easily into factory holes (either direct press in or with a minimal amount of drilling into factory holes).
Click pics below for full size-
-
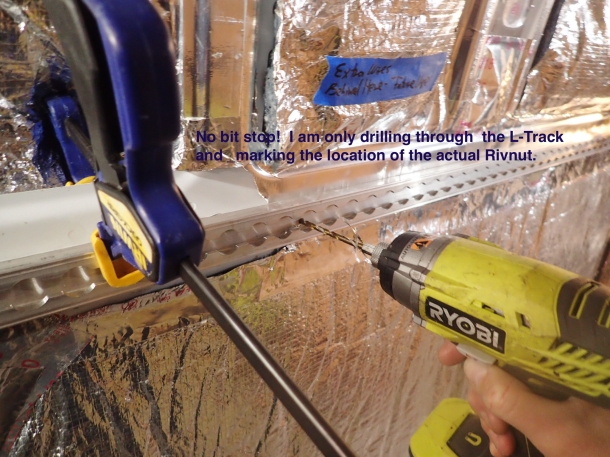
- Clamping and drilling pilot holes
-
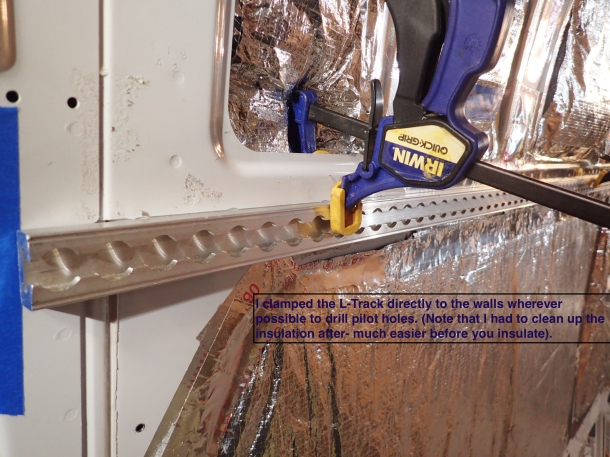
- Clamp and mark wherever possible
-

- “marking” the Rivnut location
-
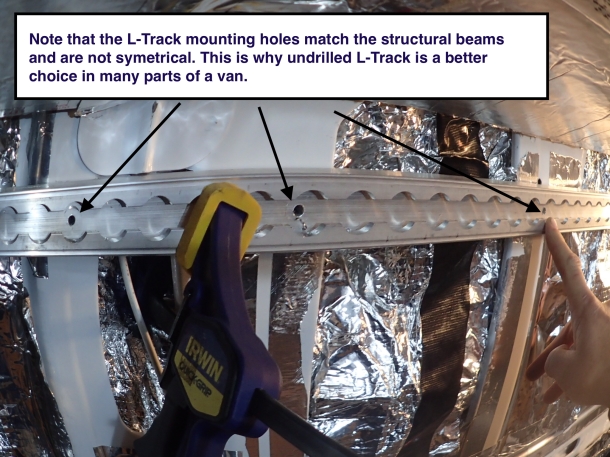
- Asymmetric holes due to structural members
I found that clamping the L-track to the wall (wherever possible) and drilling small pilot holes was the easiest way to install it. Since many of the Rivnut mounting locations are in asymmetrical locations, clamping and drilling through the L-Track to make a pilot hole worked the best for me to get an exact match.
Once the holes were marked, I removed the L-Track and marked it’s location and orientation on the back with a Sharpie. Then I drilled out the appropriate sized hole and installed my Rivnut.
The last step is to prep and drill your L-track (if using the “blank” L-track). For this I used a drill bit larger than my actual screw (5/16″ for a 1/4″ screw, for example) to give a bit of extra error correction. (I had a few holes that weren’t lined up quite right with the Rivnut and “fixed” them by widening out the hole in the right direction with a round file- often 1/32 of filing made all the difference). Then I countersunk my L-track holes with a carbide deburring bit from Amazon. The carbide bit works nicely for countersinking and I got about 50 holes in aluminum before it dulled. Pretty inexpensive at about $20 for a set of 4.
-

- This carbide bit countersinks nicely in alumnum L-track
-

- Prepping the L-track for installation
-

- Without a countersink the screw won’t sit flat
-

- After boring out the hole with a countersunk
-

- Nicely recessed!
Here’s my L-Track mounting system” in bullet point format-
- Triple check the location of your L-Track on the van.
- Clamp it to the wall in actual location wherever possible (use ledgers if you need).
- Mark your Rivnut locations with a sharpie “dot”.
- With a small drill bit, drill through the L-track and barely into the sheet metal to mark its location.
- Remove the clamps and L-Track
- Drill out your Rivnut holes, prime or paint raw metal surfaces, and install Rivnuts.
- Drill out and countersink your L-Track.
- Test fit.
For mounting L-Track on the ceiling, I found it easiest to install one Rivnut into the L-track and use it to hold the L-track in place as I marked and drilled the rest of my pilot holes.
Cutting L-Track
L-Track cuts easily with a reciprocating saw, jig saw, or angle grinder. I went a step further and bought a “non-ferrous cutting blade” for my miter saw from Amazon. Makes perfectly square burr free cuts.
Mounting L-Track with Pop Rivets
Pop Rivets are a much easier way to mount L-Track than Rivnuts. You’ll save a few steps with pop rivets but lose the ability to unscrew your L-track if necessary. Pop Rivets are not as strong as bolts, so use rivets only as a mount where you don’t need to secure large loads.
I used pop rivets to install short sections of L-Track in the rear doors (to hang a showerhead for outdoor showers or wetsuits to drip dry). I also installed L-track along the lower edge of the platform bed rails. There was a lot of potential unused storage space there.
-
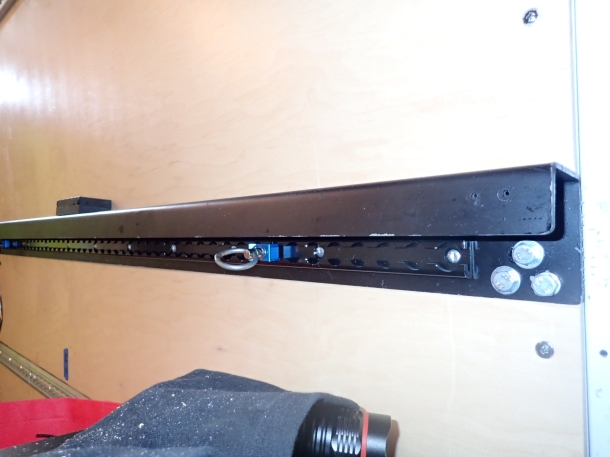
- Black powder coated L-Track on the underside of the platform bed rails
-

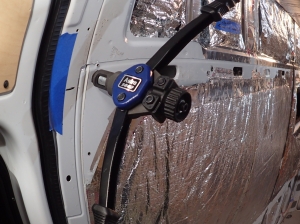
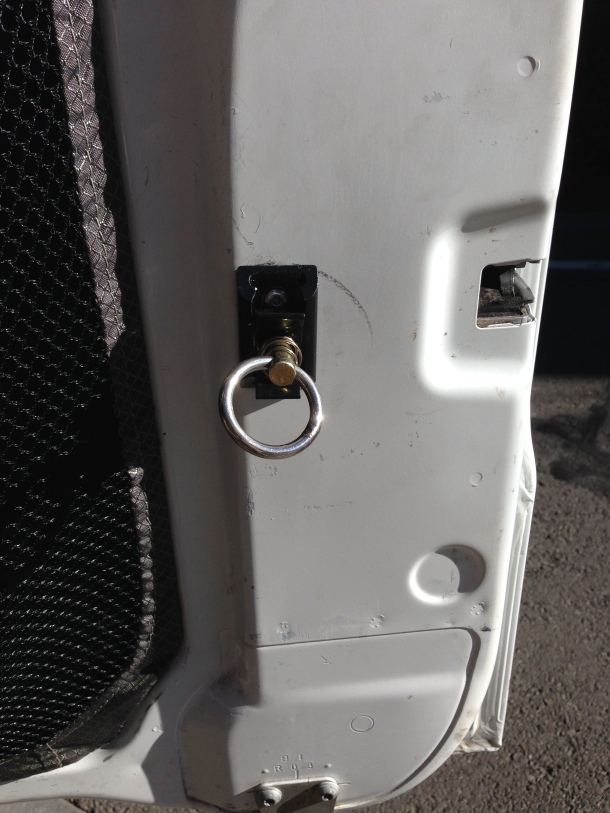
- And on the rear door (to hang a showerhead).
-

- This single point L-Track is for hanging a shower curtain across the back doors

-

- I installed L-track to make use of the nearly 12″ of unused space between the wall L-track and bed platform
-

- Not L-track. Quick Fist mounts hang axe and shovel.
L-Track Accessories
One of the great things about L-Track is the mounting accessories.
-

- Large hooks.
-

- L-Track Rings
-
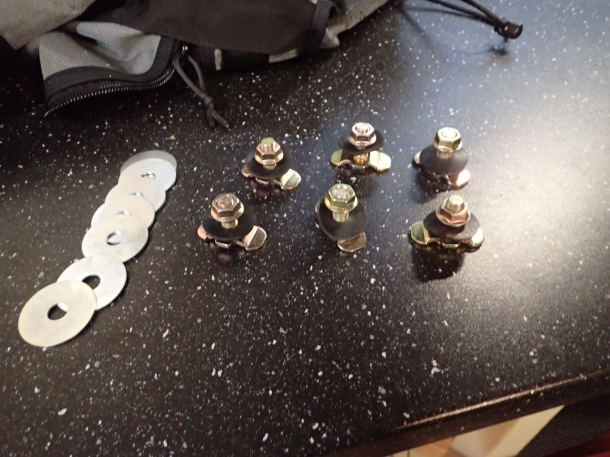
- Threaded bolts for securing cabinets and fixed loads
-
- Single point attachment rings
There are a ton additional L-track mounting accessories as well. (Click link to open a window of L-Track fittings).
Integrating L-Track into your Interior Design
I’ve always admired beautiful rustic van designs. L-Track is anything but rustic but provides Swiss Army knife function to your van.

Functional- not necessarily sexy.
You can see here that I’ve used recessed L-track to cover the joint for my plywood wall and ceiling panels.

This strip of L-Track holds the wall panels to the wall with minimal screws and provides a ledger for the upper panels.
In order to used recessed L-Track this way you may need to glue a furring strip to the edges of your wall panels. The recessed flange on the L-Track is 1/2″ deep. I used 1/4″ maple plywood for the walls and ceiling (to keep weight down) and glued 1/4″ strips to the edges of the plywood with leftover scrap. I also applied a strip of felt to the inside corner of the L-track and to the back of the furring strip to prevent any vibration or squeaking at the joint.
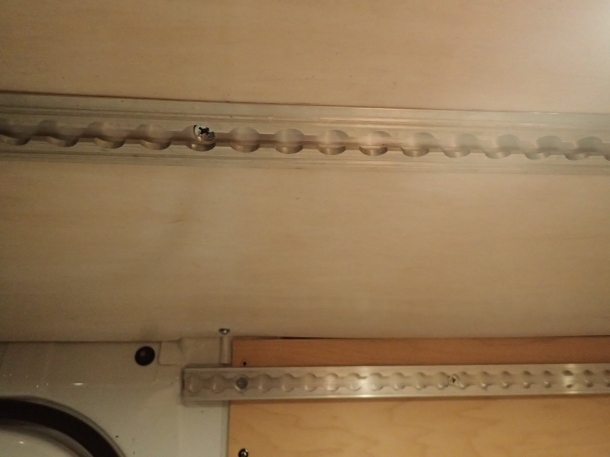
The flange on the L-Track helps to hold the ceiling panels in place using minimal screws.
Integrating wall panels with L-Track
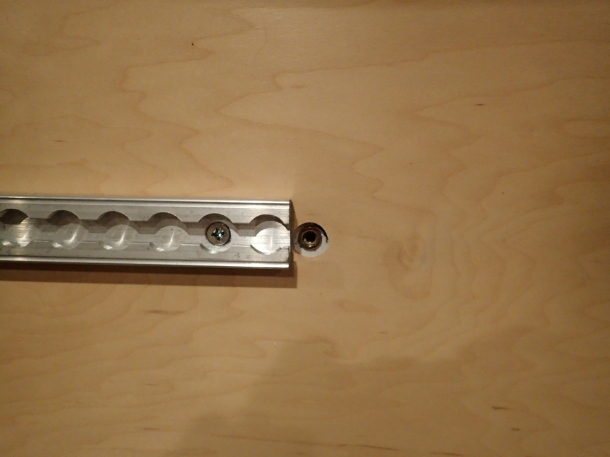
One of the benefits of L-Track is additional attachment points for your wall panels. I was pleasantly surprised to find that the L-Track pulled the wall panels nicely into the curved walls.
-
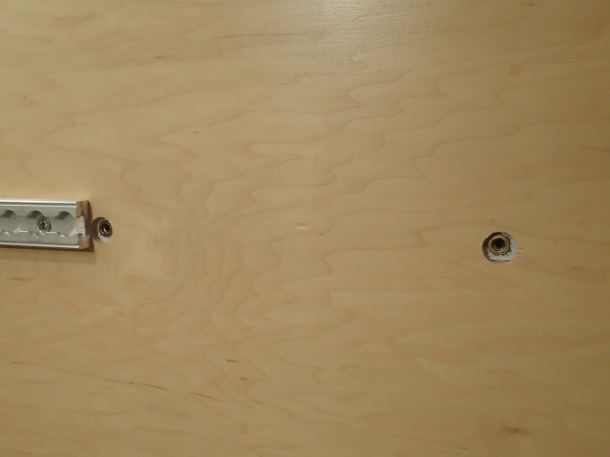
- Hole cutouts for the the Rivnuts
-
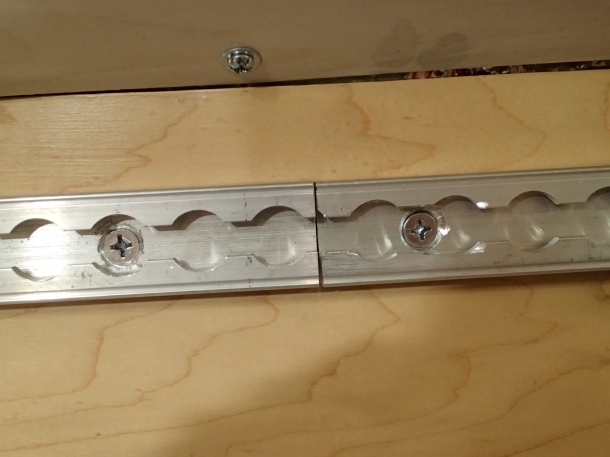
- L-Track Joint
Other Resources
Sprintervanusa.com has an outstanding blog and page on L-Track for more information.
Share this:


This is a ‘bit’ off topic. I’ve been reading your blog on your sprinter van conversion, which is useful and informative. In the ‘top 10’ headings, I found an account of the first half of your bike trip SLC to Albuquerque (17 years ago). I tried the link at the bottom, and got:
http://tahoesux.com/2012/05/07/bike-tour-ut-nm-part-2/
This site can’t be reached
tahoesux.com’s server DNS address could not be found.
I wonder two things: is there a current link; did you ever post your route?
Thanks.
LikeLike
Thanks for pointing it out! I will try to fix the link. I had “technical issues” with my whole blog (formerly coasttomountain.com) when a domain name company purchased my DNS address the moment my domain expired and tried to sell it back to me. Essentially held all my old content on a non-monetary outdoor blog for ransom.
Still figuring out how to bring back all my old content and stories.
TO answer your question. I will figure out the link. And I have an approximate route once it gets up again. This was in the days before internet, or cell phones. With paper maps, and a film camera. We did a lot of “along the way” route finding. It was approximately 1200 miles, with as much dirt and obscure roads as we could find.
We flew into SLC airport and assembled our bikes in the baggage terminal. Our route in summary was: SLC, Bryce Canyon, Escalante, Capitol Reef, Lake Powell, Arches National Park, Cortez (CO), Durango, Wolf Creek Pass, Continental Divide into NM, Taos, Santa Fe, Albuquerque.
LikeLike
Second reply. Try again. I think I restored some of the content including the Utah trip.
LikeLike
Hey Radvan! I am wondering how you secured the locking fork mounts to the L-track. I have a set of Delta fork mounts and am looking at ways to mount them onto the L track.
LikeLike
Hey Mendo Bob- I am working on a blog post for this very thing. Pics will help lots here. In a nutshell I bought a 12×12″ piece of 1/4 ‘ aluminum from Amazon and cut it into 4×4 pieces. Mounted my Delta fork mount to the aluminum plate, and used that with one of the threaded posts and a threaded plastic knob. Give ma a few days to get this posted. Words won’t work. Pics will.
I hope to visit your neighborhood for a mountain bike trip when it dries out. Just got the espar installed. So awesome! Working on an extensive post for that too. Hope you are well.
LikeLike
Excellent post… Well written and detailed! Good job on the pictures too!
We are in the process of converting our van… And I really appreciate your sharing your experiences!
Thanks,
Rock
LikeLike
Thanks! Couldn’t have done my conversion without the knowledge base of others. Just trying to pass it on.
LikeLike
Hey, thanks for all the details and the strong word in favor of Ltrack! Im in the process of planning my Ltrack runs right now and had a quick question, what did you use to attach your Ltrack to your bed rails? Did you drill through the rail and attach to the body of the van or are you attached to the rail itself?
Thanks for all the killer info!
Nik
LikeLike
Hey Nik-
I used pop rivets to secure the L–track to the Overland Sprinters bed rails. I clamped the L-Track to the rails, marked and pre-drilled the holes, then riveted them.
If I had to do it again, I would have used 3M VHB tape instead. It would have taken 1/4 of the time, be just as strong, and wouldn’t have created a rivet head on the back of the bed rails (which added an extra step in drilling clearance holes in the wall panels). Might have cost a bit more, but the time saved would have been worth it. VHB tape is amazing stuff, likely just as strong as rivets. Works best with metal-to-metal surfaces, and be sure to wipe down with a strong isopropyl alcohol to clean both metal surfaces.
Good Luck! More van content coming soon. I’m working on a diesel fired hot water system now for hot showers and dish washing. Should be pretty trick.
LikeLike
What were your dimensions for installing the L track with regards to the Soft cabinets. I am installing L track and wanted to place them on the wall and ceiling. I was looking for reference measurements for the install.
Thanks,
Tim
LikeLike
Hi Tim. I believe that the ceiling L-track was 14” from the corner. I would contact Adventure Wagon. They sent me a couple page guide for installation. I honestly can’t remember the exact measurements. Adventure Wagon makes nice stuff, and has really unique design ideas. Documentation and info lags behind their creative process and website. On the plus side. I’ve had the soft cabinets installed for about a year. They are awesome. We keep them packed with zippered bags with 2-3 days worth of clothes for all weather. More for longer planned trips. We can walk out the door for a short road trip without having to pack anything except Miss Daisy and her dog food. Sorry I don’t have more specific info.
LikeLike
Do you know what the hanging weight of L-Track is? How much can I hang from it?
LikeLike
I believe L-track can support a couple thousand pounds. Totally overkill for most vans. The key factor is the pullout strength of your fasteners, and what you have attached to them in a sudden deceleration (I.e. crash). Pullout strength for a properly installed RivNut is somewhere in the 400 pound range. Plus Nuts are likely a bit higher. It’s also the thin sheet metal of van structural members that will determine your strength. Adventure Wagon uses L-Track to secure their bed system if that’s any consolation.
Take my numbers with a grain of salt. I did read them, but it’s been over a year. You’ll be fine with good fasteners and conservative loads on them.
So yes to cabinets, hangers, outdoor gear. No to that pallet of bowling balls you wanted to carry in the van attached to your L-track.
LikeLike